Resources on how to program the GameBoy are scarce, most of the information dates back to the late 90s, early 2000s, lots of links point to websites that don't exist anymore and many development tools are discontinued or outdated.
This post is meant for people who are interested in game development on the GameBoy and have some programming background but have never done anything directly on hardware and with assembler. Its purpose is to give you an idea of what lies ahead of you and push you in the right direction. One article is definitely not enough to explain everything you need to know so you will have to do some research on your own, but I will try to provide you with the necessary information and links.
First I will give you a quick introduction on how to get started with GameBoy development. Then I will talk about some of the basic concepts that you have to consider while programming. Finally I will provide you with some additional links.
Update 01/2020: Some of the links in this article are now broken. One source that I mention a few times is the Wichita State University ECE238Spr08 class website that had files and examples by John Harrison. I have included an archive with the example files in the Resources section at the very end of this article.
Update 12/2021: GB Studio has become a popular choice if you don't have a technical background and just want to create a GameBoy game.
Michael Steil did The Ultimate Game Boy Talk in 2016 which is by far the best introduction to the GameBoy, and GameBoy development. Make sure to watch it.
Before you search for assembler tutorials it is essential that you familiarize yourself with the GameBoy hardware as good as possible. It is much more important to understand where data is stored and where you need to move it to, in order to achieve certain things, before you write your first line in assembler.
Probably the most important document is the original Pan Docs or "Everything You Always Wanted To Know About GAMEBOY - but were afraid to ask". There are three versions to my knowledge:
The original gives you a very good basis for understanding the GameBoy hardware. The John Harrison version is only a minor update to the original with references to GALP's gbhw.inc (broken). The nocash version contains much more information on the processor, sound I/O and details specific to the GameBoy Color. It is more comprehensive but can also be overwhelming for newcomers, thus I suggest you start with the original. Try to familiarize yourself as good as possible with the GameBoy hardware before you start programming.
Duo's GameBoy ASMSchool will teach you the basic architecture and instructions of the GameBoy CPU (Sharp LR35902). If you have never programmed in assembler before, this is a good source to start.
ECE238Spr08 (broken) provides many tutorials, source code examples and libraries that will help you develop your own games. It also has a HelloWorld.asm example with detailed comments explaining every step of the program. There are other examples that teach you how to load sprites and read the pad and button input.
GameBoy CPU Manual tries to combine information from different sources and documents into one concise manual that you should definitely read.
To set up your development environment you will need a text editor, preferably with syntax highlighting. I happen to use Notepad++.
Since you will need to convert numbers from decimal to hexadecimal to binary you should find a calculator that can do this for you. If you are on Windows 7 you can set the calculator to "Programmer mode" which will let you type in hexadecimal and binary numbers. This way you can check what bits are set in memory by typing in the hex value.
Next you need an assembler and linker. The Rednex GameBoy Development System (RGBDS) seems to be the standard choice. It is available on different platforms, including Windows, macOS and Linux. Check the RGBDS GitHub repository for binaries and installation instructions. Check the documentation for help.
Last but not least you need to get an emulator and debugger. I personally use BGB which has many helpful features like a visualized video RAM view and a dedicated I/O memory view.
I have compiled an archive that includes the RGBDS v0.3.9 binaries for Windows, and the following files that were downloaded from ECE238Spr08/software (broken) and slightly modified to compile with the included version of RGBDS:
assemble.bat
        Creates a GameBoy binary file from your source code
inc\gbhw.inc
        Defines symbols for all hardware addresses
inc\ibmpc1.inc
        Creates tiles for all IBM ASCII characters in video RAM
src\hello-world.asm
        HelloWorld.asm example source code
src\memory.asm
        Provides very basic memory set/copy operations
Download hello-world.zip (2020-01-09)
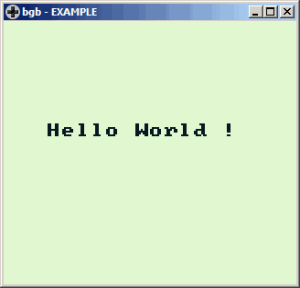
To compile the source code execute assemble hello-world in the command-line. If successful, it will result in the following output:
c:\gameboy\project>assemble hello-world
assembling...
Assembling src\hello-world.asm
Success! 3481 lines in 0.02 seconds (9080869 lines/minute)
linking...
fixing...
After that you can find hello-world.gb in the obj-folder. Open BGB and load up the game to see if it is working. You should see the text "Hello World!" being displayed in the center of the screen.
Now that you have everything set up lets talk about some of the programming concepts that you have to consider when developing. If you have already read the Pan Docs or any of the tutorials, most of the information below will sound familiar.
The first thing you have to realize is that you are working directly on memory that can be addressed, ranging from $0000 to $FFFF. The address space is separated into different areas that each serve a very specific purpose which also means that they will be interpreted differently by the hardware.
The ROM on the cartridge for example can be accessed in the range from $0000 to $7FFF. As soon as the GameBoy boots up it will execute everything that starts at $0100, which is the entry point of your program. That is basically the equivalent to the main()-method.
The GameBoy has a video RAM ($8000-$9FFF) that is meant for storing data that will be displayed on screen i.e. the 8x8 pixel images that will be used as tiles or sprites.
Tiles are immovable images that are placed on an evenly spaced grid, whereas sprites can be moved freely to any position on the screen. Usually the background of your game will consist of tiles and the moving characters will be sprites. The memory also contains information on how the background is composed by referencing the images with a simple number. Keep in mind that the background is actually bigger (32x32 tiles) than the physical LCD screen (20x18 tiles). By moving the virtual screen around you can create the effect of scrolling backgrounds, which is used in many games.
Sprites work differently than tiles. Since you can position them freely on the screen you not only have to save a reference to the image that you want to display but also its position. This is done in the Object Attribute Memory (OAM) which ranges from $FE00 to $FE9F. You can only store 40 sprites at this location.
When the LCD draws the background and sprites it will read these two memory locations and determine what to display, so if you write any other data to the video RAM the screen will most likely display random garbage.
There is also a chunk of memory that is only for communicating with the other devices ($FF00-$FF7F). If you want to turn on the LCD, move the virtual screen, change the color palette, check what buttons the player presses or operate the sound chip, you will have to change certain bits in this memory range. Knowing what bits to read and write will be essential for initializing and controlling the GameBoy hardware.
You can use the internal RAM ($C000-$DFFF) to store game related data, like how many lives your character has, what the player's score is, the game state, etc. It is very important to think about how you want to use this memory in advance, come up with data structures, figure out how much space they will require and where you want to locate them. Create a memory map that you can reference while you program and that tells you exactly what each memory range is used for.
All the data that you want to move from one memory location to another has to go through the processor (unless you use the DMA). This also gives you the opportunity to manipulate the data before you write it to the desired location. To achieve this, the processor itself has small data storages called registers. All the computations that the CPU does use these registers so the data they contain is not persistent. If you run out of registers during a calculation you can always use the stack as a storage. It is accessed quicker by the hardware than the internal RAM and is located between $FF80 and $FFFE, commonly referred to as the high RAM. The SP register, the stack-pointer, always points to the last piece of data you pushed onto the stack. If you need to store something for a longer period of time you should write it to the internal RAM.
For example if the character in your game has 5 lives you have to save this information in the internal RAM. When you initialize your game you can tell the processor to write the number 5 to the address $C000:
LD   A, 5         ;first load the number 5 into the register A
LD   [$C000], A   ;then load the contents of register A (5) to the internal RAM
You are basically initializing a variable like you would in any other language, except you have to tell the computer exactly where you want the value to be stored.
If your character loses a life you need to load the number at $C000 into register A, decrease it by one and write it back to its original location:
LD   A, [$C000]   ;load the contents of the memory at $C000 to register A
DEC  A            ;decrease the number stored in register A by 1
LD   [$C000], A   ;write the value back to the original location
There are many ways of solving things in assembler depending on what situation you are in. If you really want to get your hands dirty you can start counting the clock cycles and size of instructions to optimize your code even more. Here is an alternative to the code above:
LD   HL, $C000    ;load memory location to the 16-bit HL register
DEC  [HL]         ;decrease the value at the memory location by 1
This will save you 3 cycles and 3 bytes, provided that your HL register is free for use.
So everything you do boils down to moving and processing data. The only difference is that you have to do it very explicitly and that the programming language or the operating system does not protect you from making mistakes that could erase critical data or write garbage to the memory that interfaces with the hardware.
Aside from having to program in assembler you will spend most of your time debugging your code so a good debugger is very important. You can use a debugger to trace through your program and see what each operation does to the registers and memory. Even if it looks a little overwhelming at first you will learn where to look when in order to get the information you need.

The top-left segment of the window is for tracing through your program. It will display the assembler code as well as the operation codes in hexadecimals. By pressing F3 the debugger will go from line to line and execute each individual operation. Use F7 if you want to jump into a CALL and F8 to jump out of it. You can set breakpoints by double clicking on the line that you want the debugger to stop at. Pressing F9 will run the program until it hits a breakpoint. You will also get a visual indication of how jump operations with conditions react, look for the ~ sign.
At the bottom-left you have your memory view. If you feel like your program is not reading or writing the correct data from or to memory you can press CTRL+G to go to a specific memory location and see what is going on while you are tracing. Sometimes you forget to initialize the memory that you want to use with 00 (or any other valid value) which can result in faulty reads, or you thought that you have written something to a certain memory location but the game is not reacting to the expected data. This is where you would look for it.
The top-right segment is the register view. It is very useful for when you are writing your own calculations but they are not doing what you expect them to do. Sometimes you are overwriting data in one register that you need later in the calculation or you are reading the wrong register by accident. Sometimes you want to see if a shift-operation is giving you the data you are looking for or if a call returns the correct value. This is the only way to find out. You can also check the CPU-flags at a glance in case you need to know what flags a certain operation sets.
The bottom-right segment is your stack. Bugs that come from using the PUSH and POP operations wrong can be difficult to track. This is where you would check what data the stack-pointer is pointing to.
What makes the BGB debugger great is that you additionally have a video RAM viewer, that gives you visual feedback of your background, tiles and sprites, and the I/O map, which tells you exactly how the GameBoy is configured at the moment. Without them you would have to go through the memory yourself and tediously pick out all the information that you need so this will definitely save you a lot of time.
Also check out the map file in the obj-folder that is created when assembling the GameBoy-binary. It gives you an overview of the general memory usage of what basically is the cartridge ROM, including label and function addresses. This will be a good indicator if everything was included correctly and where you can find specific functions in the debugger.
If you have any questions about GameBoy Development, visit the IRC channel #gbdev on EFNet.
| GameBoy Dev'rs | |
| Gameboy Development |
| GBDEV | List of Game Boy (Color) development resources, tools, docs |
| Duo's GameBoy ASMSchool | Assembler basics on the GB-CPU |
| ECE238Spr08 Class [broken] | Assembly programming class on the GB-CPU |
| GALP v1.0++ [archive.org] | GameBoy Assembly Language Primer (updated by Peter Fidelman) |
| GameBoy Crib Sheet | Hardware cheat sheet |
| GBsound.txt | Sound System Guide by Jonathan Gevaryahu (01/2004) |
| GBspec.txt | Original by kOOPa (03/1998) |
| pandocs.txt | nocash updated version (10/2001) |
| gbspec.txt [broken] | John Harrison updated version (03/2008) |
| Z80 CPU User Manual | |
| GameBoy Programming Manual | Official programming manual |
| GameBoy CPU Manual | Compilation of documents |
| RGBDS | GameBoy assembler and linker (multi-platform) |
| RGBDS v1.11 | Otaku No Soku version (08/1999) |
| BGB | Recommended GameBoy emulator and debugger |
| No$GMB | GameBoy emulator and debugger by nocash |
| GBDK | GameBoy Developers Kit |
Here are some resources that I currently cannot find anywhere else but are mentioned in relation to GameBoy development in this article or other websites.
| galp.zip | GameBoy Assembly Language Primer (GALP) V1.0 by GABY |
| frohwein.zip | Files by Jeff Frohwein |
| harrison.zip | Examples by John Harrison (2008) |